Thursday, May 26, 2016

Get Your Kids to Read this Summer

Bulletin from my local library
I have always strongly felt that if I taught my kids to read, and read well, they would succeed in school.  You have to be able to read in order to follow directions in all subjects.  In order to learn about each subject.  From the time they were babies I left board books in their beds to look at when they woke up or before they fell asleep.  My husband and I took turns reading to them every night.  Daddy time is just as important as Mommy time. We would ask them questions about the stories.  We would take books in the car.  I bought a ton of books at our local thrift store, most were under $1.00.  You could also do a book exchange at school or in your neighborhood, to get more books.

Reading Nickelodeon's Dora the Explorer set bought through the scholastic book order

As the kids got older we set a bedtime a half hour earlier than what we really wanted them to go to sleep.  We told them to go to  bed at 7:30, but if they chose to read they were allowed to read until 8:00 pm.  Which most nights they chose to read.  They became great readers. They each by age 10 could read over 215 words per minute with 100% comprehension.

Reading Nickelodeon's Dora the Explorer set bought through the scholastic book order

By the time my oldest was 10, we realized they were starting to slack off reading during the summer.  They would rather stay up late playing or watching movies.  We needed to come up with an incentive.  Then, it hit me.  Our kid's school in second grade makes a goal for all the kids to read 100 hours over the school year to earn a trophy.  What if we put together a goal and reward?  We were in the middle of planning a trip to California to see a certain mouse that coming September.  As all parents know the kids all want an expensive souvenir, and most times more than one.

Reading Dreamworks Shrek, a local thrift store find.
We came up with a reward system, for every book they read they earned $.25, or reasonable number of pages in a chapter book.  By the time our trip came around each child had earned about $30.  Then, we saw the souvenir prices and decided we had better give each child a bonus of $10.  We told them this was for doing such a great job, and now were able to afford the souvenirs they wanted. 

This motivated them so well, we decided to do it again a few years later.  This time we decided to track their hours instead of pages or books.  Each child got a tracking sheet and a timer (bought at our local dollar store).  We decided $1.00 an hour was good. Then, I upped it.  If they read their scriptures or did math worksheets they could double it.  By the time we went on our trip each child had earned $50 or more.  Most importantly they read all summer.  One daughter almost completely finished reading her scriptures front to back.

The next summer, my husband got a deal on some Amazon Kindle Fires and wanted to buy them for the girls.  I don't like to spoil the kids, so I told him that was fine, but they had to earn them.  So, my girls are older now and we made a goal of 100 hours before they could get their Kindle.  Again, double time for scripture study and math worksheets.  Two of my three girls earned their kindle my the time school started, and the third a few months later.  That was a really hefty goal, and I am so proud of them for reaching it.

Every child has something they want, so instead of just buying it for them, make them earn it.  They learned so much these past few summers.  They learned about the topics they read, got a little Jesus, didn't fall behind on math, and felt proud of themselves for completing a very hard goal.  They take much better care of their Kindles since they earned them, then they would if we had just bought them for them.  For a bonus, we let them pick a screen protector and case.

This works great, but as a parent you have to follow through and stick to the rules you set in place or it won't work.  This worked great for my kids, but each child is different, and you might need to tweek our ideas to fit your kids ability.

Other fun summer family ideas:

Catch Frogs
frog hunting

Have Fun with Bubbles
bubble painting


Friday, May 6, 2016

Mother's Day Preschool Craft/Gift

mustruninthefamily.com


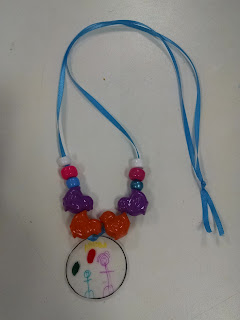
We made these Shrinky Dink necklaces in our Preschool Class for Mother's Day,
 and they were too cute not to share.


I cut out the Shrinky Dink into circles (6 per page) by tracing a cup, 
I used a regular hole punch to make the necklace hole.


I explained how important these necklaces were, and that they were gifts for their mothers.  
So do your very best!

  I gave a few ideas on what they might want to include.
Let the kids decorate them as they wished with permanent markers.


We followed the manufacturers directions on the Shrinky Dink packaging,
 to shrink them in the oven.


Tied them off with ribbon for the necklace, but you could use a chain, cord or elastic jewelry string.

The kids asked if they could put beads on them.


We made these cute cards found on www.athriftymum.com which also includes a printout. 
I used hand sized stamp pads, but you could use paint.


On the inside I had them write a cute message to mom on the right hand side and draw a picture on the left hand side.


Wrapped it up with a clear party bag with crinkle paper and a bow.  
Hole punched the card in the corner and tied them together.


The pictures don't do them justice, they really turned out cute!

This could even be made as a key chain for Dad Father's Day
or have each child make one for a charm bracelet/necklace.

Think of the possibilities:
Mother's Day
Father's Day
Grandparent's Day
Valentine's Day
Teacher Appreciation
Christmas ornament
Military-To wear with Dog Tags

If you liked this post, you might also like:
Wash Your Hands
Hand print

Faux Stained Glass Vase

Tuesday, May 3, 2016

Faux Stained Glass

mustruninthefamily.com

I remember making these faux stained glass projects as a kid in Mr.Olsen's 4th grade class.  I often thought they would be fun to make with my kids.  Then, I found the paint on clearance at my local craft store.  I was so excited for my girls to try it.  They loved it!  They even had a friend over, who asked if I would buy her a kit for her birthday.

You can buy them as a kit with the simulated liquid lead and a few window colors or individually.
These are the ones we used.


I prefer the look of simulated lead.  However, The simulated liquid lead is a little thick and hard for little kids to squeeze out, so we bought a bottle of black puffy paint to try as well.  Worked like a charm, did seem to take longer to dry and is still softer when completely dry.  Plus, it's a lot cheaper.


You need a large variety of window color colors.
Keep in mind the color darkens and becomes translucent when dry.  
Be sure to  check the color the bottle says it is, not just what it looks like wet.


We used clear transparency film we bought at our local thrift store, or you can use glass from a frame.
*If you use glass it could cut you or break easily so use caution! 
Transparency film is highly recommended!


We found pictures of stained glass on-line, in coloring books, or we made our own.
Just make sure that all lines are closed to give it the stain glass look, and for color separation.


Tape the picture to the table.  
You don't need to be quite as extreme as my daughter, just enough to hold it in place.


Place the transparency paper over the desired design.
If wanted you can tape it down.


With your simulated lead trace the design onto the transparency paper.
You will want a thick even bead.


Some lines were too intricate, so we simplified our designs as we went.
You may want to do this before you begin.

Inspired by a image uploaded to www.pinterest.com
Inspired by a picture found on www.decorative-films-by-maryanne.com
Inspired by a picture found on www.bestglasspatterns.com
Inspired by a picture found on www.freetattoodesigns.org
Wait a few hours for you simulated lead to dry.


Once dry, fill in simulated lead sections with the window color completely.


Pop any bubbles with a toothpick, they will show if not popped.


We used a Q-tip to clean up any mistakes.


If you are taking window color to the edge of the paper, it must be outlined in simulated lead, to hold the color in.


Once window color is completely filled in, let dry over night.


This picture is done on a 4X6 glass frame.

Image inspired by the band twenty one pilots logo
 www.twentyonepilots.com


The Final Result. 


It dries soft and lightly bendable.
It will crack if bend too much.


You can hang in a window with the transparency paper attached.
Or
You can make it a window cling by gently peeling the transparency paper off the completely dried window color.  I don't recommend peeling off the transparency paper, because it tears easily, sticks in places and you have to of completely and thickly coated every bit of the transparency paper with window color to remove in tact.

I recommend hanging it so the transparency paper touched the window to prevent the sun from melting the window color to the actual window.  Also, use caution if window coverings touch the simulated lead or window color it might eventually stick to it and be hard to remove.

The kids had a blast making these faux stained glass projects and we hope you do too.

If you liked this project you might also like:
Faux Stained Glass

Sharpie tie dye