Showing posts with label Young Women craft. Show all posts

Thursday, June 30, 2016

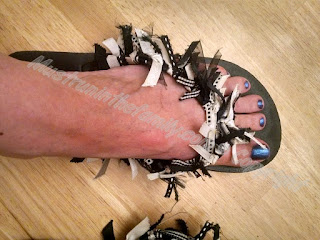
Summer flip flops

Every summer we get a new pair of flip flops and decorate them.
You can pick up a cheap pair for a dollar almost anywhere.

mustruninthefamily.com

These ones were super fun and easy to make. 
They are by far my favorite  flip flops that I have decorated.

I bought a set of matching ribbon.
I loved it, because it came with ten different matching ribbons.
I only caution the silky ribbon might come untied.

I cut the ribbon about 3" and started at the toe and tied the ribbon on one side.
I then tied the ribbon in the same order on the other side.

For and easier project for younger kids:
Just wrap one ribbon continuously around the flip flop either hot glue or tie the ends

mustruninthefamily.com

My frilly camouflage flip flops are very soft and comfortable.
Check out the yarn section of your local craft store for ideas.

For these flip flops I cut the fringe (We used Bernat Boa Yarn (amazon link)) about 3" and tied it around the flip flop. Pushing them together as I went.

mustruninthefamily.com

These ones are made by wrapping the fringe around the flip flop and tying it off.
This method it a lot easier and still super cute!
The girls Grandmother made these.

mustruninthefamily.com


mustruninthefamily.com

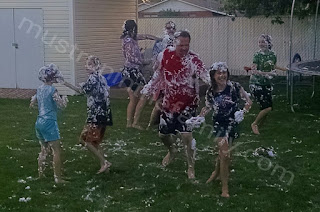
We made these super fun water balloon flips flops at a mother and daughter party at our local church.


They turned out super cute.
One package of Water Balloons (amazon link) 100 per pair will do.
Add or minus water balloons depending on how far down the sides you want them to go.

Fake fur yarn, regular yarn, cut fabric, cut denim, leather strips, tulle or feathered boa might also make cute flip flops.

If you liked this post you might also like:
penny bracelet

mustruninthefamily.com


We'd love to hear how you flip flops turned out!

Tuesday, December 29, 2015

Blankets for Project Linus

volunteer kids

We like to involve ours kids in volunteer work, but sometimes it's hard to find something for them to do.  Our local church group was making quilts and blankets to donate to Project Linus.  I wanted each child to be able to complete a project all by themselves, so we decided on fleece blankets.  We wanted the blankets to be warm, so we opted to tie two fun colors together.  This way is a little more expensive because it involves two pieces of fleece.  
There are many other places you can donate blankets to.  Your local children's hospital, nursing home, children's justice center, shelter, and a sick neighbor are some great donation locations, even some fire departments and schools collect them.

volunteer work

We first vacuumed our recently steam cleaned floor. You can use a table top.
(Be cautious of pet hair and cleanliness depending on your donation location)

We used 1 1/2 yards of  fabric for each color, I am planning on using 2 yards when we do it again, they just seemed a little small.  Whatever size you pick, keep in mind that they get smaller, because you are cutting them and tying them.

Place the two colors of fleece on top of each other and trim off any excess, making the two pieces of fabric the same size.

how to measure your fleece blanket

Decide how long and wide you want you knots and fringe.


We made our the width of the ruler, because it made it easy for the kids to measure.
we made them 3" long, again, it made it easier for the kids. Use fabric scissors to cut both colors still on top of each other.

If it helps, you can use a disappearing fabric marker.  We just cut as we went.


We simply tied our cut strips on the top and bottom fleece together.


Take pictures of their masterpieces.  My girls loved how cute they turned out and were a little sad they couldn't keep them, but definitely wanted to donate them.  They were proud of themselves!


volunteer work

I took the excess strips we cut off the fabric during sizing, and braided them together.  I used this to tie the blankets shut, giving them a more gift like professional appearance.

volunteer kids

If possible, take your kids to deliver their blankets,
 letting them see for themselves, the difference their act of kindness makes in another's life.

Teaching your kids when they are young to volunteer and give, will plant the seed of compassion for a lifetime of contribution!

Wednesday, August 26, 2015

Smashed Penny Jewelry


penny bracelet


We love to get smashed pennies from all the fun places we visit.  
Its a great souvenir if you don't want to spend a lot, or junk up your house with nick knacks.

Smashed Pennies from Disneyland
Vacation Pennies
If you want to find a specific smashed penny you can check out the pennycollector.com.
They have a list of smashed pennies and their location.  Great idea to check it out before you go on vacation or that special place you want to collect pennies from.  
Click on locations  
Click on the State you are located in 
a list of locations of smashed pennies will appear
Some will have  pictures of the smashed penny stamps available.

First, you'll need to decided what kind of jewelry you want to make with your pennies, and count how many pennies you want to include.

Penny charm bracelet
Pennies linked together
If you just want to link the pennies together, you will only need enough pennies 
and jump rings to fit around your wrist or neck, and a clasp for the end. 
 This is also the quieter bracelet, because the pennies are stationary.

penny bracelet
Pennies charm bracelet style
  If you like the dangly penny style better, you'll need a chain as long as your wrist, a clasp for the end, and as many jump rings as pennies you want to include.  This style works best if you have a lot of pennies you want to include.  You can even make this a necklace.  The dangly style is a little loud to wear as a bracelet, because the pennies hit each other with movement.  It's not quite as loud as a necklace since the pennies don't move quit as much.

 To size a larger chain, measure chain out and use your pliers to open and remove extra rings.


 If your pennies are a little grungy, they might need a little shine.  We searched pinterest for the best methods to clean our pennies and we found this method worked the best click here.

shine a penny
1. Salt and Vinegar


penny bath
3. Add Penny


Shine a penny
2. Mix salt into the vinegar
We used 1/4 cup white vinegar and 1 teaspoon of table salt.
The vinegar is 5% acetic acid this dissolves the copper oxide and
 the salt acts as a catalyst and speeds up the cleaning process. 

Now that your pennies are all shiny and beautiful, and you've decided what style bracelet/necklace you want to make, grab your drill, 1/16" drill bit, and two needle nose pliers or jewelry pliers.


Drill bit size 1/16"
Drill your penny over wood
 Once you've gotten your drill and bit, hold or clamp your pennies one at a time and drill where you want your hole.  We found most of the pennies had a lip on the top, so we drilled right under the lip.  You just want there to be enough space for your jump rings to hold on.  Over a piece of scrap wood drill your hole.
Repeat this step for all your pennies.


Drilled Smashed Penny
Drilled hole in penny just under the lip


Now, your ready to assemble your bracelet.  Grab your needle nose pliers or jewelry pliers, chain, jump rings, clasps, and your hole drilled pennies.


 Using your pliers, pull open one jump ring per penny and attach to bracelet/necklace.  


It's a good idea to start attaching the pennies in the middle of the chain and working out. 
Disneyland Smashed pennies
penny bracelet


You can convert a bracelet into a necklace.  Simply attach another chain or necklace hooking the clasp of the necklace to the end ring of the bracelet and the clasp of the bracelet to the end ring of the necklace.  The best of both worlds, wear it sometimes as a bracelet and sometimes as a necklace.

If you have a favorite penny you can wear it by itself, or add beads.

I made one that is only from our big trip to California and another that is one penny collected from many different locations like a real charm bracelet,

have fun and get creative!

If you liked this post you might also like:

Kids Summer Bucket List

mustruninthefamily.com


mustruninthefamily.com