Showing posts with label Halloween Craft. Show all posts

Thursday, August 23, 2018

Personalized Pumpkins


We love, love, love Halloween at our house.  Our house goes from crazy Halloween decorations filling our house to a few small items for Thanksgiving.  I wanted to make Thanksgiving a little more special.  I found these fake pumpkins and tried to think how I could make them special.

I decided to personalized them.

I decorated this huge pumpkin with my Last name and year I was married.

Then, I made these smaller pumpkins and put mine and my husbands first names.  Of course, my kids were like "Where's our pumpkins?"  Not all decorations have to be about the kids.  My whole house has the kid's pictures and artwork all over it.  I just wanted these pumpkins to be about me and my husband.  However, if you want the whole family included you can make even smaller pumpkins for the kiddos. 

The Awesome thing about these pumpkins is that you can decorate both sides of the pumpkins for the different holidays.

I used my Silhouette Cameo to design and cut Oracal 651 gold vinyl.

I played around with different fonts and ways of writing our names.  My sister in law wanted one that said "Give Thanks."  I made one for a friend that had her address number on it for her porch.

I put our Last name on a large 9 inch white pumpkin, sorry no pictures.


I put our first names, address number and "Give Thanks" on 5.5" orange carvable faux pumpkins.


Cut out the design and add the transfer paper.


Measure out on your pumpkin where you would like it placed.
I set the pumpkin on the table and used a ruler to measure it out.  With my pencil I marked where to place the bottom of the vinyl. I like to use a pencil, because it is erasable.


You do have to be a bit careful when applying the vinyl.  The pumpkin is bumpy and curved, making the vinyl a little trickier to apply.  Which is why I don't have a picture applying the vinyl.  I folded the vinyl almost in half on the non sticky side.  You don't want to crease it.  Then I carefully rolled the vinyl over the pumpkin, pushing the vinyl into the grooves as I went.  I removed the transfer paper, and rubbed the vinyl to help adhere it to the pumpkin.  If you have bumps and the vinyl looks a little off, you can use a blow dryer to heat up the vinyl and push it down in the problem areas.  Be careful not to get it too hot though, the pumpkin is Styrofoam and will melt or off gas.


And you have a beautiful pumpkin!

If you liked this post, you might also like:

mustruninthefamily.com

mustruninthefamily,com

mustruninthefamily.com

Thanksgiving

Gothic Dolls

mustruninthefamily.com

Saturday, October 28, 2017

Carton of Eyes


Our entire house is decorated for Halloween, but our kitchen is lacking a bit.  We wanted to make realistic decorations.  This would be awesome even placed in the refrigerator.  Imagine your party guests opening the refrigerator and finding this.  What a great conversation piece.  What I love the most is the cost.  The only thing I had to buy was the eyeball ping pong balls, and they cost me $1.  Everything else I already had.  We had a lot of fun making this Halloween craft.


You can add other Halloween decorations to make it a bit more special, like these spiders and bugs.


What you'll need
1 Paper Egg Carton with 12 slots
12 Eyeball Ping Pong Balls
Hot Glue Gun & Glue
Tuscan Red Paint
Optional: Fake Bugs and Spiders


You could just leave it plain and boring like this one, but we thought it didn't look very realistic and needed blood and optic nerve pieces.


So, we decided to add Hot Glue and Paint it.


First, we glued the eyeball ping pong balls in.  I desired you can make some of the optic nerve stringiness on the sides of the egg slots before adding the eyeball ping pong balls.


Glue over the top of the eyeball ping pong balls a bit, but don't over do it.


Pick off some of the smaller stringy pieces of glue left over after the hot glue cools.
Leave some of the bigger pieces to paint.


This is my go to color for blood, most people make the mistake of making the blood to red and it just looks unrealistic and fake.  You could use glossy or flat depending on your preference.


Then, you just start painting the dried hot glue.


It's ok if it's not perfect, because it just looks like the blood smeared there, but don't be super sloppy.


Don't forget to paint whatever glue strings you left behind.


Super Cheap, and Super Creepy!


If you like this post, you might like all our other Halloween craft, party, and food ideas. Click the link Below.

mustruninthefamily.com


Monday, November 21, 2016

Pumpkin Zentangle

mustruninthefamily,com

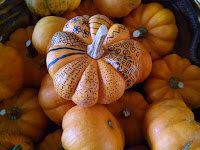
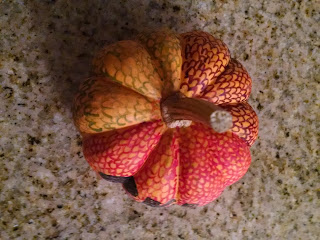
We have just been swimming in mini pumpkins at our house.  One plant produced about 100 pumpkins.  Even after playing games, decorating the house, and giving several away we still have about 40 left.  My middle child started drawing zentangle designs on a pumpkin.  The next thing you know, everybody wants to do one too.  The girls had a blast with this easy craft.  I think it would be fun to put out a basket of pumpkins and permanent markers on your Thanksgiving table to do before and after you eat.  To keep the kids busy while you're cooking or cleaning up.  A great time filler.  *keep away from small children, unless you want to clean permanent marker off your entire house.

mustruninthefamily,com

Grab a pumpkin big or small, real or fake. Draw a different design, on each section with a permanent marker.

mustruninthefamily,com

mustruninthefamily,com

mustruninthefamily,com

mustruninthefamily,com

mustruninthefamily,com

mustruninthefamily,com

You might have to wipe the tip of the marker off occasionally from pumpkin skin residue.

mustruninthefamily,com

mustruninthefamily,com

They also make a really cute and simple decoration for your Thanksgiving display.

mustruninthefamily,com

If you liked this post, you might also like:
Thanksgiving

mustruninthefamily.com

mustruninthefamily.com


mustruninthefamily.com

pumpkin seeds